Try This (5/15/11)
Cameras are a wonderful tool for expressing your thoughts visually provided that you know how to get your camera to “say” what you want. The most basic step in getting the camera to speak for you is making sure it captures the “correct” amount of light to convey whatever it is that you want to “say”.
To that end one must learn how to control the camera with regards to how much light is captured.
Try This: Place your camera on a tripod. Point the camera at something with a fairly uniform tone, like a fence or a lawn. Zoom in so that only that tone is seen in the viewfinder. Next change the camera’s capture mode to Manual, yes – Manual. For some this might be daunting and downright scary. But believe me your camera will not be harmed and furthermore, if you make a “mistake” you can just delete it. However what we want to see here are the mistakes and learn from them. You might need to consult your camera manual.
Now that you have the camera in manual mode, consult the camera manual and determine which buttons or wheels control the adjustment of the Aperture and Shutter. I know for example on most Canon DSLR cameras, the aperture is controlled by the large thumb wheel in the middle of the back of the camera just to the right of the LCD and the shutter is controlled by the small finger wheel in the front of the camera just under the shutter release button. On Nikon DSLR cameras, the aperture is controlled by a small finger wheel on the front of the camera just under the shutter release button and the shutter is controlled by a similar wheel on the back of the camera at the top right, behind the shutter release button.
With the camera now on a tripod and in manual mode, adjust the aperture to its largest setting, i.e. the smallest f-number something like f4, f3.5 or f2, and set the shutter speed to its longest setting, for most cameras 30 seconds.
Now press the shutter release button, you will need to wait 30 seconds for the exposure to complete and then look at the LCD. What do you see? If everything went as described, you should see a completely white screen, and possibly blinking black to white. This is extreme over-exposure. In other words too much light got into the camera.
Now, start reducing the aperture size by dialing in larger f-numbers. For example if you started out at f3.5 now go to f5.6 then f8, f11, f16, f22 and so on until you run out of f-stop settings. Each time making that 30 second exposure and examining the LCD. It is possible that even at the smallest aperture opening, like f22, with that 30 second shutter speed you won’t see much difference.
Now dial in the next shorter shutter speed, most likely 15 seconds and then make photos with increasing aperture sizes going from f22 back to f3.5 or whatever your maximum aperture is. Examine your LCD each time.
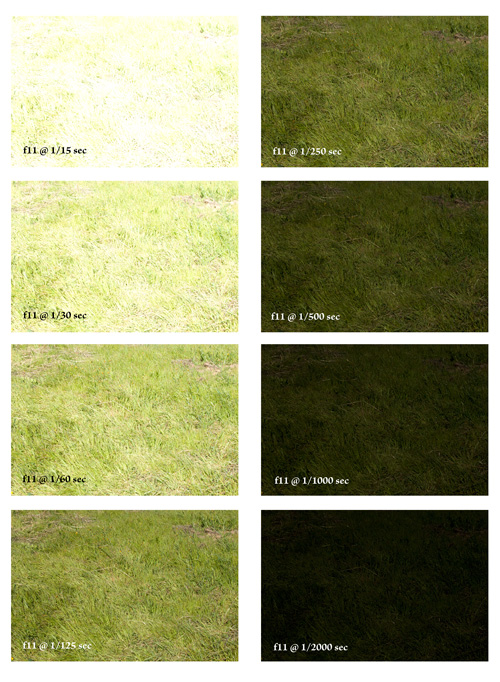
Continue to repeat this with every shutter speed setting you have 8 seconds, 4 seconds, 2 seconds, 1 sec, 1/2 sec, etc.. until you reach the shortest shutter speed probably 1/2000 sec or 1/4000 sec. At least one if not several aperture-shutter combinations will give you a photo that will resemble the uniform tone you have your camera pointed at. In fact the photo that closely resembles that tone will probably be the one you like least as it will probably be not what you thought you “saw”. A series of these photos that I made is shown below. Oh, and for the record, I liked the f11 @ 1/60 sec exposure best, even though the camera indicated that it would have given me the f11 @ 1/125 sec exposure.
This is the first step to mastering your camera to convey what you want it to, learning how to take control of exposure. To learn more about photography consider taking an Organic Light Photography Workshop. You’ll learn more about exposure and a whole lot more.
