Exposure - Part 1
One of the most frequent questions that I get during workshops and classes is: "What exposure should this scene be taken at?" That is sometimes a difficult question to answer because it the answer depends on so many variables. The simplest of which are calling out an aperture and shutter speed, and the most difficult aspects fall under what intent does the person asking the question have in making the photo in the first place.
When the camera is set to auto exposure, it does the best job it can at rendering the scene presented before it as middle toned, however this might nit be what the photographer has in mind when making such a photo. For example in the previous technique in creating silhouettes, that last thing that you want is for the camera to render the scene as middle toned, for then the sky will be much brighter and the foreground objects that were supposed to be in silhouette are blotchy figures showing some detail but not enough to make them recognizable.
So the first step in coming up with an exposure is to ask ourselves how do we want to render the scene before us. Is it to capture it as we see it, or do we wish to alter it so as to create a mood or stop motion or create blur. Once we have the intent in mind, we can go about working out the physical parameters needed to produce such an image.
So to start, lets look at the physical parameters that we have to work with that will allow us to produce in image the way we want it. Every camera relies on three parameters in making an image: the aperture, the shutter, and the ISO speed. Lets take each one on its own and then combine all their effects in the end.
The aperture of a lens can be thought of as the pupil of the eye. With the eye, the muscles of the iris contract and relax to close and open the pupil depending on how much light is available. In low light, the iris will relax its muscles and the pupil opens up to allow as much light as possible into the eye. When the light is very bright, the iris contracts and thus making the pupil very small and in turn restricting the amount of light entering the eye. The aperture works very much in the same way.
During an actual photographic exposure the size of the aperture will determine HOW much light reaches the light sensitive medium. The f-stop numbers designate the size of the aperture. These f-stop numbers are a sequence of numbers that are based on the area of a circle with a comparable sized opening as the aperture itself. The sequence itself should be familiar: f/1, f/1.4. f/2, f/2.8, f/4, f/5.6, f/8, f/11, f/16, f/22, f/32, f/45 etc... Just so that you know where these numbers come from lets look at the math for a moment. To obtain the actual numbers themselves in whole stop increments as listed you would need to compute the relatively simple formula  . Where X starts at 0 giving f/1 and then for each whole number (1,2,3,4...) the formula gives the next whole f-stop number in the list above. Use 1.5, 2.5, 3.5, 4.5.... for X and the formula gives the half-stop increments of the f-stop series and so on. . Where X starts at 0 giving f/1 and then for each whole number (1,2,3,4...) the formula gives the next whole f-stop number in the list above. Use 1.5, 2.5, 3.5, 4.5.... for X and the formula gives the half-stop increments of the f-stop series and so on.
The important thing to remember is that the lower the f-stop number, the larger the aperture and the larger the f-stop number the smaller the aperture. I know, you would think it would be the other way around, but notice how the f-stops are written, f/4 for example, it looks like a fraction, say like 1/4. Well we know from fractions that 1/4 is smaller than 1/2, but at the same time it is bigger than 1/8 and so on. It would also help immensely to memorize the f-stop sequence, as it will be very helpful in the field when determining exposure, as we will soon see.
The next thing you need to know about the aperture is that moving from one f-stop to the next whole f-stop the amount of light that passes through it will either be doubled or halved. So for example, f/4 lets in twice as much light as f/5.6 but only one half as much light as f/2.8. Or, f/16 will let in twice as much light as f/22 but only half as much as f/11. What this means is that keeping all the other two parameters of exposure (shutter and ISO) fixed, changing the aperture alone will thus darken or brighten a scene that is rendered in a photograph.
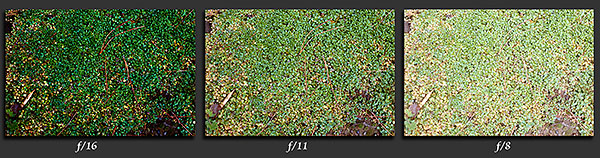
In the sequence of images above only the aperture was changed and it can be seen that as we go from f/16 to f/11 to f/8 the image becomes brighter with each stop.
Now in addition to affecting amount of light that reaches the film or sensor, the aperture is also responsible for what is known as the Depth of Field or Depth of Focus, DOF for short. Next time we will continue with this technique series in Part 2 with how the aperture affects the DOF.
Was this article helpful?
Click Here and let us know.
Your feedback is important to us.
|
|
|


